Bạn có thể chèn tiện ích này dưới tiêu đề hoặc cuối bài viết trong blogspot để giúp trang web của bạn được phổ biến hơn khi tạo điều kiện cho người dùng chia sẻ nó.
Ảnh demo:

Với 2 bước đơn giản là chèn CSS và HTML vào phần mẫu ta sẽ được tiện ích này rất dễ dàng.
Bước 1: Chèn CSS trước /b:skin
.share-art{position: relative;display: block;overflow: hidden;}.sa-title{display:block;float:left;margin:17px 15px 8px 0;padding:0}
.sa-title strong{font-size:16px;display:block}
.share-art a{float:left;font-size:12px;line-height:30px;color:#fff;-webkit-border-radius:2px;-moz-border-radius:2px;border-radius:2px;margin:8px 3px;padding:1px 20px;height:30px;text-align:center}
.share-art a:hover{background-color:#222;color:#fff}
.share-art a i.fa{font-size:12px}
.share-art .facebook{background-color:#003471}
.share-art .twitter{background-color:#00BFF3}
.share-art .googleplus{background-color:#EA4D29}
.share-art .pinterest{background-color:#C6393D}
.share-art .linkedin{background-color:#0077B5}
Bước 2: Chèn HTML bên dưới vào vị trí cần hiện
<div class='share-box'> <div class='share-art'><a class='facebook' expr:href='"http://www.facebook.com/sharer.php?u=" + data:post.url + "&title="+ data:post.title' onclick='window.open(this.href, 'windowName', 'width=600, height=400, left=24, top=24, scrollbars, resizable'); return false;' rel='nofollow' target='_blank'><i class='fa fa-facebook'/><span> Share on Facebook</span></a> <a class='googleplus' expr:href='"https://plus.google.com/share?url=" + data:post.url + "&title=" + data:post.title' onclick='window.open(this.href, 'windowName', 'width=600, height=400, left=24, top=24, scrollbars, resizable'); return false;' rel='nofollow' target='_blank'><i class='fa fa-google-plus'/><span> Share on Google+</span></a><a class='twitter' expr:href='"http://twitter.com/share?url=" + data:post.url + "&title=" + data:post.title' onclick='window.open(this.href, 'windowName', 'width=600, height=400, left=24, top=24, scrollbars, resizable'); return false;' rel='nofollow' target='_blank'><i class='fa fa-twitter'/></a> <a class='pinterest' expr:href='"http://pinterest.com/pin/create/button/?url=" + data:post.url + "&media=" + data:post.firstImageUrl + "&description=" + data:post.snippet' onclick='window.open(this.href, 'windowName', 'width=600, height=400, left=24, top=24, scrollbars, resizable'); return false;' rel='nofollow' target='_blank'><i class='fa fa-pinterest-p'/></a> </div> </div>Ví dụ:
Để chèn nút share cho blogspot nằm dưới tiêu đề. Bạn chuột phải và kiểm tra phần tử tại tiêu đề.
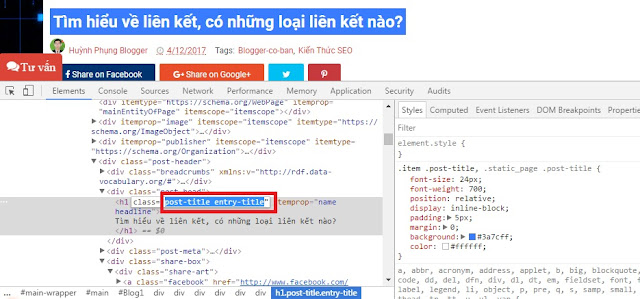
Như blog mình là tìm dòng post-title entry-title rồi chèn dưới đoạn code đó.
Nếu như bạn đang dùng Font Awesome 5 trở lên thì dùng HTML sau thay cho bước 2:
Code Font Awesome 5
Xóa code Font Awesome 4.7 trở về trước và thay lại code sau
<script type='text/javascript'>
//<![CDATA[
function loadCSS(e, t, n) { "use strict"; var i = window.document.createElement("link"); var o = t || window.document.getElementsByTagName("script")[0]; i.rel = "stylesheet"; i.href = e; i.media = "only x"; o.parentNode.insertBefore(i, o); setTimeout(function () { i.media = n || "all" }) }
loadCSS("https://use.fontawesome.com/releases/v5.1.0/css/all.css")
//]]>
</script>
Code HTML
Chèn code này thay cho bước 2
<div class='share-box'> <div class='share-art'><a class='facebook' expr:href='"https://www.facebook.com/sharer.php?u=" + data:post.url + "&title="+ data:post.title' onclick='window.open(this.href, 'windowName', 'width=600, height=400, left=24, top=24, scrollbars, resizable'); return false;' rel='nofollow' target='_blank' title='Chia sẻ lên Facebook'><i class='fab fa-facebook'/>
<span> <b:if cond='data:blog.isMobileRequest == "false"'>Chia sẻ ngay lên</b:if> Facebook</span></a> <a class='googleplus' expr:href='"https://plus.google.com/share?url=" + data:post.url + "&title=" + data:post.title' onclick='window.open(this.href, 'windowName', 'width=600, height=400, left=24, top=24, scrollbars, resizable'); return false;' rel='nofollow' target='_blank' title='Chia sẻ lên Google+'>
<i class='fab fa-google-plus'/>
<span> <b:if cond='data:blog.isMobileRequest == "false"'>Chia sẻ lên</b:if> Google+</span></a><a class='twitter' expr:href='"https://twitter.com/share?url=" + data:post.url + "&title=" + data:post.title' onclick='window.open(this.href, 'windowName', 'width=600, height=400, left=24, top=24, scrollbars, resizable'); return false;' rel='nofollow' target='_blank' title='Chia sẻ lên Twitter'>
<i class='fab fa-twitter'/></a>
<a class='linkedin' expr:href='"https://www.linkedin.com/shareArticle?url=" + data:post.url + "&title="+ data:post.title' onclick='window.open(this.href, 'windowName', 'width=600, height=400, left=24, top=24, scrollbars, resizable'); return false;' rel='nofollow' target='_blank' title='Chia sẻ lên Linkedin'><i class='fab fa-linkedin'/></a>
<b:if cond='data:blog.isMobileRequest == "false"'>
<a class='pinterest' expr:href='"https://pinterest.com/pin/create/button/?url=" + data:post.url + "&media=" + data:post.firstImageUrl + "&description=" + data:post.snippet' onclick='window.open(this.href, 'windowName', 'width=600, height=400, left=24, top=24, scrollbars, resizable'); return false;' rel='nofollow' target='_blank' title='Chia sẻ lên Pinterest'><i class='fab fa-pinterest-p'/></a>
</b:if>
<div class='fb-like' data-action='like' data-layout='box_count' data-share='false' data-show-faces='true' data-size='small' style='margin-top:3px;float:right;margin-right:5px'/>
</div> </div>
Chúc bạn thành công![/tintuc]
